dev-resources.site
for different kinds of informations.
How to setup the Dependency-Track? ( Dependency-Track : PART - 01 )
What is Dependency Track?
Dependency Track is a significant project within OWASP. It helps organizations monitor software dependency vulnerabilities. It also offers guidance on dependency usage along with dependency licenses, as explained in Component Analysis. This is achieved by leveraging CycloneDX SBOM.
It is ideally used in CI/CD environments, and here we're going to use it with Github Actions.
Source : Image from https://docs.dependencytrack.org/integrations/ecosystem/
What is Software Bill of Materials ( SBOM )?
SBOM is a document that describes the components (packages, frameworks, software, etc.) used in an application. It provides greater transparency for the application. CycloneDX is a standard for Software Bill of Materials (SBOM).
How does Dependency Track find vulnerabilities from SBOM?
The Dependency Track discovers vulnerabilities from SBOM by scanning through the components listed in the SBOM. Once the scan is complete, It matches components with known vulnerabilities from various databases, such as NVD, VulnDB, etc as shown in the ecosystem diagram above.
Now let’s check how to setup the Dependency Track with GitHub Actions for a NodeJs project. Before doing that we can try to run manually first.
1. Setting up the Dependency Track
1.1. Download the Docker engine as a prerequisite, Checkout the link.
1.2. Download the docker compose file :
curl -LO https://dependencytrack.org/docker-compose.yml
1.3. Up the Dependency Track server : docker-compose up -d
a.Note that the platform front-end will run in localhost:8080 and back-end will run in localhost:8081
b.Ping http://localhost:8081/api/swagger.json to get API doc.
c.Username : admin, Password : admin this is the default credential to access the platform.
Dashboard ( localhost:8080/dashboard )
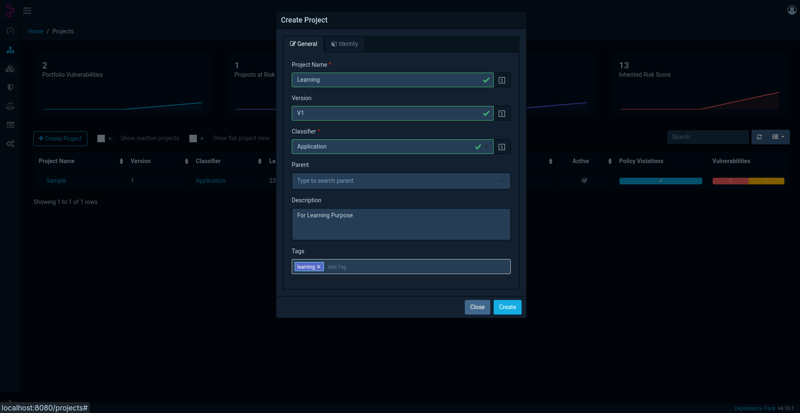
2. Create Project
Project List ( localhost:8080/projects )
Form
Project Details Page ( localhost:8080/projects/2118e953-575f-4208-a544-9b8492bc9f86 ). Here “2118e953-575f-4208-a544-9b8492bc9f86” is the project id and we need this data in upcoming step.
3. Create CycloneDX SBOM For The NodeJs Project
3.1. Install the npm package cyclonedx-npm globally :
`sudo npm -g i @cyclonedx/cyclonedx-npm`
3.2. Open the project directory in terminal and enter the command:
`cyclonedx-npm --package-lock-only --output-file <file_name>.json`

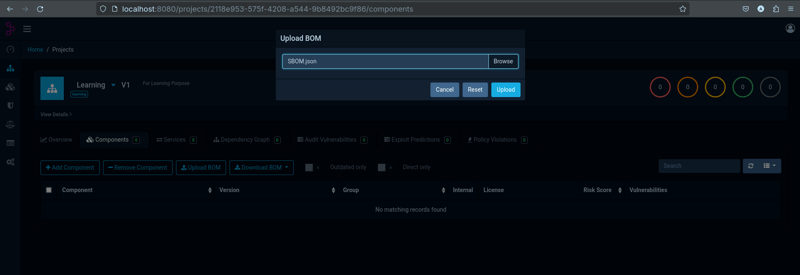
4a. Upload The SBOM Using GUI
Upload the file ( localhost:8080/projects/2118e953-575f-4208-a544-9b8492bc9f86/components )
After uploading the file(localhost:8080/projects/2118e953-575f-4208-a544-9b8492bc9f8/components)
4b. Upload The SBOM Using API
We have to use API while we use the platform with GitHub Action.
curl --location 'http://localhost:8081/api/v1/bom' \
--header 'X-Api-Key: <API_KEY>' \
--form 'project="<PROJECT_ID>"' \
--form 'bom=@"/path/to/SBOM/file"'
To get the API key go to http://localhost:8080/admin/accessManagement/teams and select automation team. Keep the API key secure.
Finally, we've learned how to use Dependency Track for a Node.js project. Now, we can explore how to use it with GitHub Actions. Before doing so, we need to ensure the Dependency Track back-end is publicly available. As a short-term solution to this, we can set up Ngrok.
Configure GitHub Action In Project Repository
-
Set repository secret
While setting up GitHub Actions, we must store sensitive data as repository secrets in the settings. Please note that you must have admin access to the repository in order to change the settings.
- Set a workflow in main branch
name: Generate SBOM and Post to Dependency-Track
on:
  workflow_dispatch:
jobs:
  build:
    runs-on: ubuntu-latest
    steps:
      - name: Checkout code
        uses: actions/checkout@v2

      - name: Setup Node.js
        uses: actions/setup-node@v2
        with:
          node-version: '18'

      - name: Install CycloneDX
        run: npm install -g @cyclonedx/cyclonedx-npm

      - name: Generate SBOM
        run: npx cyclonedx-npm --package-lock-only --output-file SBOM.json

      - name: Post SBOM to Dependency-Track
        run: |
          response=$(curl --location '${{ secrets.API_URL }}' \
          --header 'X-Api-Key: ${{ secrets.API_KEY }}' \
          --form 'project="${{ secrets.PROJECT_ID }}"' \
          --form '[email protected]')
          echo "Response from curl= $response"
Host The Server In EC2
Check out the link for reference
- Launch EC2
- Assign Elastic IP
- Install Docker :
sudo snap install docker - Download the docker compose file :
curl -LO https://dependencytrack.org/docker-compose.yml - Up the Dependency Track server :
docker-compose up -d -
Configure Nginx
server {
    listen 80;
    server_name <YOUR_PUBLIC_IP_ADDRESS / DOMAIN_NAME>;
    access_log /var/log/nginx/reverse-access.log;
    error_log /var/log/nginx/reverse-error.log;
    location / {
        proxy_pass http://127.0.0.1:8080;
        proxy_set_header Host $host;
        proxy_set_header X-Real-IP $remote_addr;
        proxy_set_header X-Forwarded-For $proxy_add_x_forwarded_for;
    }
        location ~ /api/v[1-9]/ {
        proxy_pass http://127.0.0.1:8081;
      }
}
References
Conclusion
In this part we’ve covered how to setup the Dependency-Track on your local system and on AWS EC2 .
I hope you enjoyed this article. Please leave your suggestions in the comments below and let me know if you’d be interested in reading a Part 2.
Featured ones:


