dev-resources.site
for different kinds of informations.
Look Mum, No Servers! Create a Telegram Bot to communicate with GitHub Actions
- TL;DR
-
Essentials First
- Crafting Your Telegram Bot
- From DevOps to BotOps
- Deep dive into the GitHub Actions Configuration
-
Steps to Configure Your Pipedream Workflow
- Step 1. Command Reception : Set up a trigger for Telegram bot commands.
- Step 2. GitHub Interaction : Automate file updates in your repository.
- Step 3. Delay for Action Completion : Ensure synchronization with GitHub Actions.
- Step 4. Results Retrieval : Fetch the solved puzzle from the repository.
- Step 5. Notification : Inform the user about the solution directly through Telegram.
- Conclusion
- Get the Source Code
- What To Do Next
TL;DR
Telegram isn’t just for sending and receiving chat messages. It’s also for automating your dialog flow, including workflow.
Using a Telegram Bot gives you the ability to check prices, query status, solve puzzles, and even have a fun conversation.
And if you’re a serious developer or engineer, you can create your own Telegram Bot to manage your servers, view user details, and open or close issues.
GitHub-Actions-Telegram-Bot is a Telegram bot that allow you to communicate with a GitHub Actions pipeline that may return an output message.
Essentials First
Gear up by setting up accounts on (no credit card required):
- Telegram for instant messaging automation.
- GitHub for repository management and actions.
- Pipedream for connecting apps and automating workflows.
Crafting Your Telegram Bot
My previous article Building a Telegram Chat with a MT4 Forex Trading Expert Advisor contains a prerequisite tutorial on How to Create a New Telegram Bot.
It’s a goldmine for those into crypto or forex trading too.
From DevOps to BotOps
GitHub Actions, a powerhouse for CI/CD, lets you automate builds, tests, and deployments. Integrating it with a Telegram Bot creates a dynamic duo for automating workflows beyond the traditional scope.
A typical workflow for a CI/CD pipeline is to make some changes to your repository files, then add and commit these file changes. The pipeline may trigger on a push, or any event types, that you have defined in a GitHub Actions config file.
We can extend this CI/CD pipeline by creating a webhook that listens for a Telegram bot command to start a chain of events, which includes automating the CI/CD pipeline. The result of the pipeline may then be returned to the Telegram bot.
In this article, you’ll have a bit of fun by creating a Telegram Bot to automate solving a sudoku puzzle and returning the result.
You’ll send a command (prefix with a /) to the Telegram Bot. For example:
/solve PUZZLE_STRING
This triggers a chain of events, which includes automating the GitHub Actions pipeline, and the result is a text message reply that contains the solved puzzle.
Deep dive into the GitHub Actions Configuration
TL;DR: You can fork the source code from my GitHub repository for a head start.
Before diving into configuring the workflow, let’s take a peek at how the GitHub Actions configuration works.
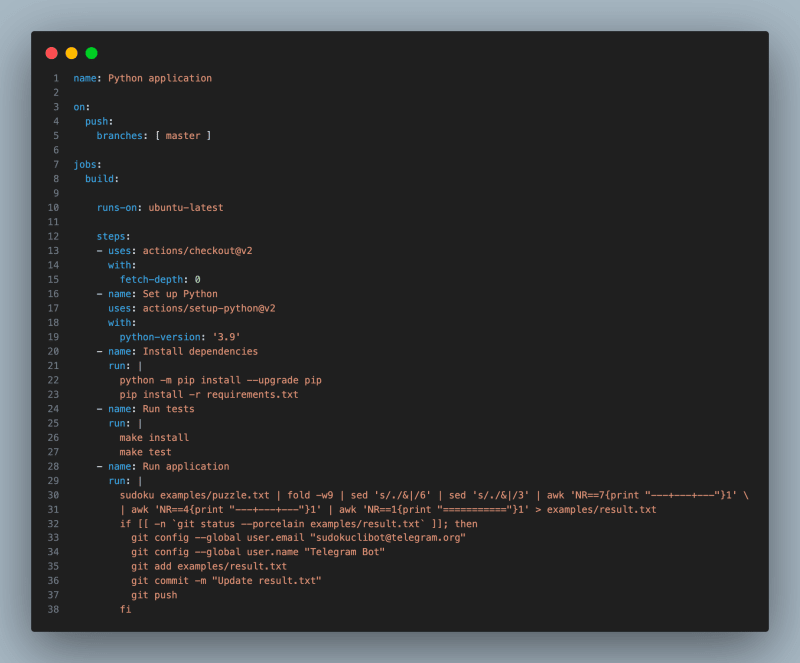
To create a GitHub Actions pipeline, we have to specify:
- Name of the GitHub Actions
name. - Type of trigger events
on. - An array of jobs
jobs.- A base image
runs-on. - An array of steps
steps. - Checkout git repo.
- Set up Python.
- Install dependencies.
- Run tests.
- Run application.
- A base image
Let’s look at an example.
We name the GitHub Actions Python application, and it will trigger on each push to the master branch.
There is one job build using the base image ubuntu-latest that runs each of the steps listed above.
- The first step checks out the git repository, with a minimum commit history of
fetch-depth. - The second and third steps install
Python 3.9and the dependencies inrequirements.txt. - The fourth and fifth steps run the unit tests and application.
For the final step, the command sudoku reads the file examples/puzzle.txt containing a PUZZLE_STRING. The return output string is then piped through a series of formatting commands using sed and awk and into the file examples/result.txt. The result.txt file is compared to the last commit and a new commit is created only if there is a change in the file.
Steps to Configure Your Pipedream Workflow
TL;DR: You can copy the configuration from my Pipedream workflow for swift integration.
In order to create a webhook that listens for your Telegram bot commands, and starts a chain of events, which includes automating the CI/CD pipeline, you’ll need to create a workflow in Pipedream.
At a helicopter view, the steps to configure are as follows:
- Step 1. Command Reception : Set up a trigger for Telegram bot commands.
- Step 2. GitHub Interaction : Automate file updates in your repository.
- Step 3. Delay for Action Completion : Ensure synchronization with GitHub Actions.
- Step 4. Results Retrieval : Fetch the solved puzzle from the repository.
- Step 5. Notification : Inform the user about the solution directly through Telegram.
Your TELEGRAM_BOT_TOKEN that you created in the previous section will come in handy here.
- Navigate to your Pipedream dashboard > Projects.
- Click New Project, and name the project Telegram-Bot.
- Click Save, and your project should appear under Projects.
- Click on your project name, navigate to Resources.
- Click on New > Workflow, and name the workflow Sudoku-Actions.
- Click Create Workflow, and your workflow should appear under Resources.
Step 1. Command Reception : Set up a trigger for Telegram bot commands.
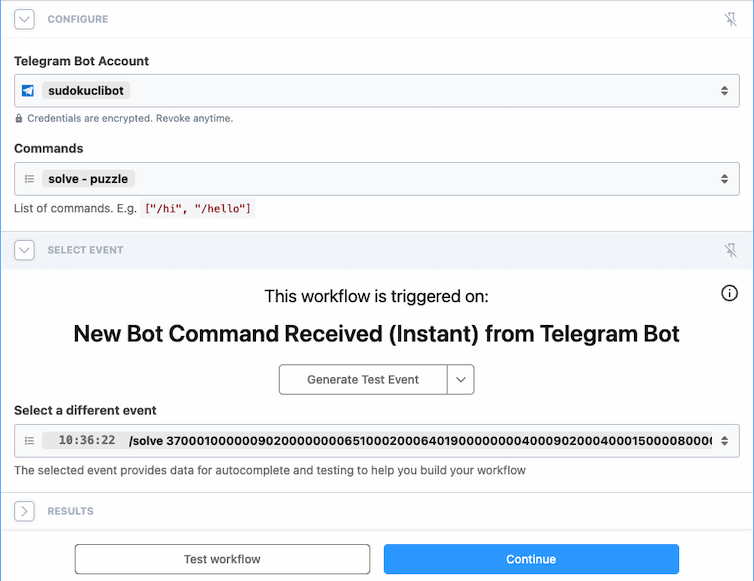
Now that you have created a workflow, let’s create a trigger.
- Click on your workflow name, and search for Telegram app.
- Select Telegram Bot > New Bot Command Received (Instant).
- In the Telegram Bot Account, select Connect new account.
- In token, enter your TELEGRAM_BOT_TOKEN.
- In nickname, enter your Telegram bot name.
- Click Save, and your telegram bot should appear under Telegram Bot Account.
- Select Commands > and select one or more commands.
Now to test your first action, open your Telegram app and send a command from your Telegram bot. For example:
/solve 600009130700000090209500004926345000800006340473001000197004603302007000508900007
Step 2. GitHub Interaction : Automate file updates in your repository.
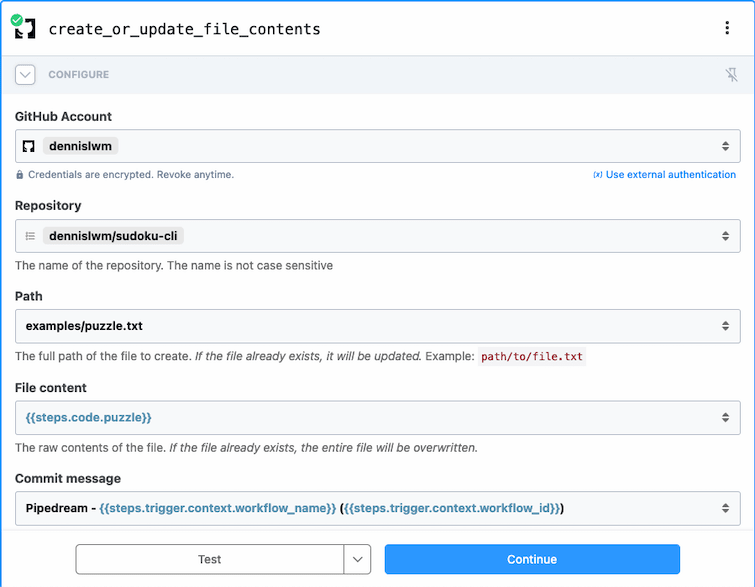
Now that you have created a trigger, let’s create some actions.
- Click on the + icon (below your trigger), and search for GitHub app.
- Select GitHub app, and search for file contents.
- Select Create or update file contents.
- In the GitHub Account, select Connect new account.
- Follow the steps to connect your GitHub account.
- Click Save, and your account should appear under GitHub Account.
- Click Repository, search for and select sudoku-cli.
- In Path, enter
examples/puzzle.txt. - In File content, enter
{{steps.code.puzzle}}.
Step 3. Delay for Action Completion : Ensure synchronization with GitHub Actions.
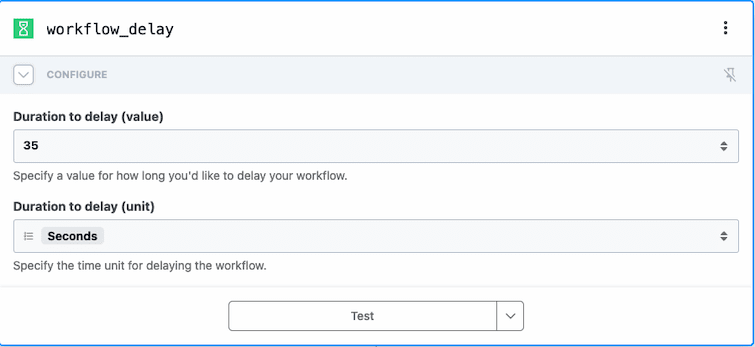
As the GitHub Actions pipeline may take some time to execute, you will need to set a fixed period of delay in your workflow.
- Click on the + icon (below your previous), and search for Workflow delay app.
- Select Worflow delay app.
- In Duration to delay (value), enter
35. - In Duration to delay (unit), enter
seconds.
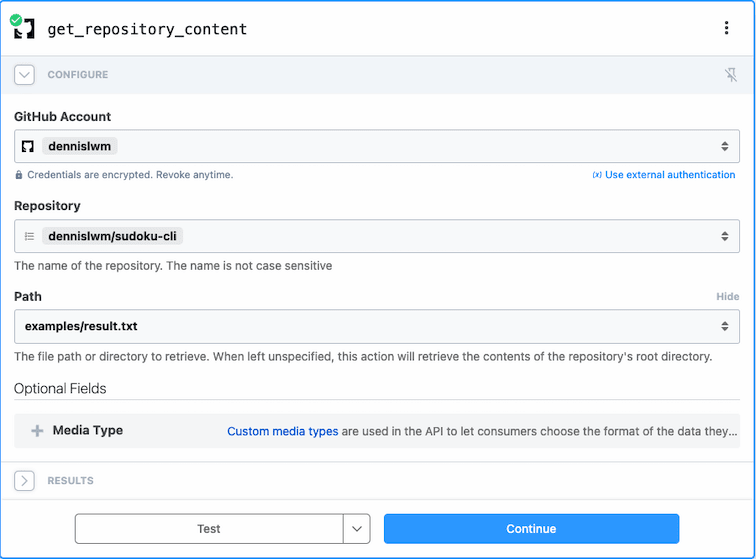
Step 4. Results Retrieval : Fetch the solved puzzle from the repository.
The next step is to get the result from the repository.
- Click on the + icon (below your trigger), and search for GitHub app.
- Select GitHub app, and search for get repository.
- Select Get repository content.
- Click Repository, search for and select sudoku-cli.
- In Path, enter
examples/result.txt.
Step 5. Notification : Inform the user about the solution directly through Telegram.
The final step is to send a text message to your Telegram bot.
- Click on the + icon (below your trigger), and search for Telegram app.
- Select Telegram app, and search for send text.
- Select Send text message or reply.
- Click Telegram Bot Account, search for and select sudokuclibot.
- In Path, enter
{{steps.trigger.event.message.chat.id}}. - In Text, enter
{{steps.base64_decode_string.data}}.
Conclusion
In this article, you created a GitHub Actions to run a Python application sudoku that accepts a file containing a PUZZLE_STRING, and returns the result in an output file result.txt. You then created a Pipedream workflow that listens to your Telegram Bot for a given command /solve PUZZLE_STRING that starts a chain of events, which includes automating the CI/CD pipeline. The workflow then replies to your Telegram Bot with the contents of the file result.txt.
By creating a bot that automates tasks and streamlines workflows, you’ve taken a significant step towards adopting modern DevOps practices.
Get the Source Code
You can copy the above configuration from my Pipedream workflow Telegram Bot > Sudoku-Actions.
You can download the above source code from my GitHub repository dennislwm/sudoku-cli.
What To Do Next
You can elevate your bot’s capabilities by:
- Minimizing Wait Times : Streamline results delivery by integrating direct feedback mechanisms from GitHub Actions to your Telegram bot.
- Expanding Functionality : You can enrich your bot with new commands for diverse tasks, such as transcribe a YouTube video, check next T-Bills auction dates, etc.
Embrace this journey to automate and innovate, shaping the future of how we interact with technology.
Was this article useful? Help me to improve by replying in the comments.
Featured ones:


